
Windows Event Viewer is a powerful tool that allows you to monitor and troubleshoot various system events and errors. It provides detailed logs that can help you identify and diagnose issues on your Windows system. This comprehensive guide will walk you through the process of using Event Viewer logs to troubleshoot Windows problems effectively.
1. Introduction to Event Viewer
Event Viewer is a built-in Windows tool that provides insights into the events and activities occurring on your computer. It records various system events, errors, warnings, and information that can help you diagnose and troubleshoot issues on your Windows system. This guide will introduce you to Event Viewer, explain the significance of event logs, and delve into the types of event logs available.
1.1. Understanding Event Logs
Event logs are records of events and activities that happen on your Windows computer. These events can range from simple information messages to critical system errors. Event logs provide valuable data that can help you understand how your system is functioning, track down problems, and make informed decisions about troubleshooting and optimization.
1.1.1. Key Points to Understand:
- Events and Entries: Each event is recorded as an entry in the event log. An entry contains information about the event’s timestamp, source, severity level, and additional details.
- Severity Levels: Events are categorized into severity levels, such as Information, Warning, Error, and Critical. These levels indicate the urgency and impact of the event.
- Event Sources: Events are generated by various sources, including the operating system, applications, hardware components, and services.
- Timestamp: Each event is timestamped with the date and time when it occurred, helping you trace events chronologically.
1.2. Types of Event Logs
Event logs are categorized into several types based on the nature of the events they record. Windows Event Viewer organizes logs into these main categories:
- Application: This log records events generated by software applications and programs. It can provide insights into application crashes, errors, and successful operations.
- Security: The security log captures security-related events, such as user logins, access control changes, and security policy modifications. It’s essential for monitoring system security and detecting unauthorized activities.
- System: The system log contains events related to the Windows operating system, system components, and hardware. It’s particularly useful for diagnosing startup issues, driver problems, and system crashes.
- Setup: The setup log records events during the installation or configuration of Windows and applications. It’s valuable for tracing installation issues and changes to system settings.
- Forwarded Events: This log is used for collecting events from other computers on your network. It’s helpful for centralizing event data for analysis and monitoring.
- Custom Logs: You can create custom logs to record events from specific applications or services that don’t fit into the default logs. These logs allow you to focus on specific areas of interest.
Each type of event log serves a unique purpose, and understanding their contents can significantly assist you in diagnosing problems and optimizing your Windows system.
Event Viewer and its event logs are essential tools for monitoring, diagnosing, and troubleshooting issues on your Windows system. By understanding event logs and their types, you’ll be better equipped to navigate through Event Viewer, interpret event entries, and use the information to address problems and ensure the optimal performance and stability of your computer.
2. Opening Event Viewer on Windows
Event Viewer is a built-in Windows utility that allows you to view and analyze event logs. It provides insights into various system activities and errors. This guide will explain two common methods to open Event Viewer: using the Start Menu and using the Run command.
2.1. Using the Start Menu
- Click on the “Start” Button: In the Windows taskbar, locate and click on the “Start” button. This is typically represented by the Windows logo.
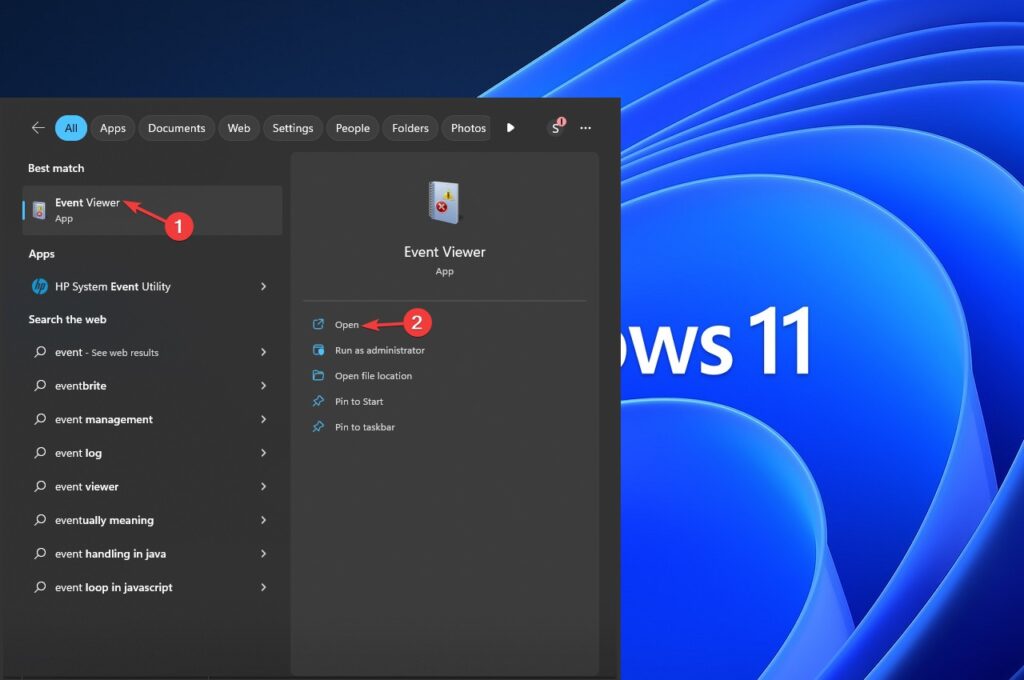
- Search for Event Viewer: In the search bar that appears after clicking the “Start” button, type “Event Viewer” (without quotes). As you type, the search results will start populating below the search bar.
- Click on Event Viewer: Among the search results, you should see an option labeled “Event Viewer.” Click on it to open the Event Viewer application.
- Event Viewer Interface: The Event Viewer window will open, displaying the available event logs and their categories in the left-hand navigation pane.
2.2. Using the Run Command
- Press Win + R: Simultaneously press the “Windows” key and the “R” key on your keyboard. This will open the Run dialog box.
- Type “eventvwr.msc”: In the Run dialog box, type “eventvwr.msc” (without quotes) and press Enter or click “OK.”
- Event Viewer Interface: The Event Viewer application will launch, displaying the different event logs and their categories in the left-hand navigation pane.
Opening Event Viewer using either the Start Menu or the Run command is a straightforward process that provides you with access to valuable event logs. Once you have Event Viewer open, you can navigate through the logs to view and analyze events, helping you troubleshoot issues and monitor the performance of your Windows system.
3. Navigating Event Viewer
Event Viewer is a versatile tool that provides insights into various events and activities happening on your Windows system. It categorizes events into different event logs based on their nature. This guide will help you navigate Event Viewer by providing an overview of event categories and explaining how to view event details within the logs.
3.1. Overview of Event Categories
Event Viewer organizes events into different categories, each representing a specific area of your system. Here are the main categories of event logs:
- Application: This log records events generated by software applications and programs. It includes information about application crashes, errors, successful operations, and more.
- Security: The security log captures security-related events, such as user logins, access control changes, and security policy modifications. It’s essential for monitoring system security and detecting unauthorized activities.
- System: The system log contains events related to the Windows operating system, system components, and hardware. It’s particularly useful for diagnosing startup issues, driver problems, and system crashes.
- Setup: The setup log records events during the installation or configuration of Windows and applications. It’s valuable for tracing installation issues and changes to system settings.
- Forwarded Events: This log is used for collecting events from other computers on your network. It’s helpful for centralizing event data for analysis and monitoring.
- Custom Logs: You can create custom logs to record events from specific applications or services that don’t fit into the default logs. These logs allow you to focus on specific areas of interest.
3.2. Viewing Event Details
- Open Event Viewer: Start by opening Event Viewer using the method you prefer, such as the Start Menu or the Run command.
- Navigate to Event Log: In the left-hand navigation pane, click on the event log you want to explore. For example, click on “Application,” “Security,” or “System.”
- View Event List: In the middle pane, you’ll see a list of events within the selected log. Each event is represented by a row and includes columns such as “Date and Time,” “Source,” “Event ID,” and “Level.”
- Select an Event: To view details of a specific event, click on it. The event details will be displayed in the bottom pane.
- Event Properties: In the event details pane, you’ll see information about the selected event. This includes the event’s timestamp, source, level, description, and more.
- Interpreting Event Data: Pay attention to the event’s “Level” (severity), “Source” (application or system component), and “Event ID” (unique identifier). These details provide insights into the nature and impact of the event.
Navigating Event Viewer involves selecting the appropriate event log category and exploring the events within that category. By understanding the different event categories and how to view event details, you can effectively use Event Viewer to monitor system activities, diagnose issues, and optimize the performance and security of your Windows system.
Read Also : How To Turn Off Automatic Updates On Windows 11?
4. Interpreting Event Log Entries
Interpreting event log entries is a crucial skill when using Event Viewer to troubleshoot Windows issues. Each entry provides valuable information about the events occurring on your system. This guide will help you understand event types and levels, as well as how to identify error codes within event log entries.
4.1. Event Types and Levels
Events in Event Viewer are categorized into different types and levels based on their nature and severity. Understanding these categories helps you gauge the impact and significance of each event:
- Information: These events provide general information about the operation of applications, services, or the system itself. They are typically not critical and often serve as logs of routine activities.
- Warning: Warning events indicate potential issues or conditions that might lead to problems if not addressed. They serve as alerts for situations that need attention.
- Error: Error events indicate that something has gone wrong. These events can range from minor errors that don’t affect system stability to critical errors that require immediate attention.
- Critical: Critical events indicate severe problems that can cause system crashes, data loss, or other serious issues. These events demand immediate action to prevent further problems.
4.2. Identifying Error Codes
Error codes are numeric or alphanumeric values that provide specific information about the nature of an issue. These codes help you pinpoint the cause of the problem and can be used to find solutions online. Here’s how to identify error codes within event log entries:
- Event ID: In the event details pane of Event Viewer, you’ll find an “Event ID” value. This is a numerical identifier unique to each type of event.
- Research the Event ID: Search for the event’s Event ID online. Many websites and resources provide lists of Event IDs along with their meanings and possible solutions.
- Correlate with Error Code: Some Event IDs directly correspond to error codes. The error code might be mentioned in the event description or associated with the event.
- Troubleshooting with Error Codes: Once you’ve identified the error code, you can use it to find relevant troubleshooting steps or solutions. Look for articles, forum posts, or documentation related to that specific error code.
Interpreting event log entries involves understanding the different event types and levels, as well as identifying error codes to diagnose problems accurately. By recognizing the significance of events and error codes, you can prioritize issues and take appropriate actions to resolve them. Event Viewer’s event types, levels, and error codes are powerful tools that empower you to effectively troubleshoot and maintain your Windows system.
5. Using Event Viewer for Troubleshooting
Event Viewer is a valuable tool for troubleshooting various Windows issues. Whether you’re dealing with application crashes, hardware problems, or system errors, Event Viewer provides insights that can help you diagnose and resolve issues. This guide will show you how to use Event Viewer to troubleshoot common Windows problems, filter event logs, and search for specific events.
5.1. Common Windows Issues
5.1.1. Application Crashes:
- Open Event Viewer and navigate to the “Application” log.
- Look for events with “Error” or “Critical” levels that correspond to the time of the application crash.
- Review event details to identify the application causing the crash and any associated error codes.
- Research the error code online to find possible solutions, such as updating the application or reinstalling it.
5.1.2. Driver and Hardware Issues:
- Check the “System” log in Event Viewer.
- Look for events indicating hardware failures, driver conflicts, or unexpected system restarts.
- Investigate events with “Error” or “Warning” levels to identify the problematic hardware or driver.
- Update or reinstall the relevant drivers, or consider replacing faulty hardware components.
5.1.3. System Startup Problems:
- Navigate to the “System” log.
- Examine events around the time of system startup for errors or warnings.
- Look for events related to drivers, services, or components that failed to start.
- Use the error codes provided to troubleshoot and resolve startup issues.
5.2. Filtering Event Logs
Filtering event logs allows you to narrow down the events displayed, making it easier to focus on specific issues. Here’s how to filter event logs in Event Viewer:
- Right-click on the event log you want to filter (e.g., “Application” or “System”).
- Select “Filter Current Log.”
- In the “Filter Current Log” dialog box, set filter criteria such as event levels, keywords, or date ranges.
- Click “OK” to apply the filters.
5.3. Searching for Specific Events
Event Viewer allows you to search for specific events using keywords or criteria. Here’s how to search for events:
- Open Event Viewer and select the log you want to search within.
- In the right-hand pane, click on “Find…” or press
Ctrl + F. - Enter keywords related to the issue you’re investigating.
- Click “Find Next” to navigate through the search results.
Using Event Viewer for troubleshooting empowers you to diagnose and address a wide range of Windows problems. By examining event logs, filtering entries, and searching for specific events, you can identify the root causes of issues and take appropriate actions to resolve them. Remember that interpreting event log entries and researching error codes are essential steps in effectively using Event Viewer to troubleshoot and optimize your Windows system.
6. Creating Custom Views in Event Viewer
Custom views in Event Viewer allow you to focus on specific types of events or events that match certain criteria. This feature streamlines your troubleshooting process and helps you quickly access relevant information. This guide will explain how to create custom views by filtering events based on keywords, date and time, and how to save these custom views for future use.
6.1. Filtering by Keywords
Creating a custom view based on keywords allows you to focus on events related to specific applications, components, or issues. Here’s how to create a custom view using keyword filters:
- Open Event Viewer and navigate to the desired event log (e.g., “Application” or “System”).
- In the right-hand pane, click on “Create Custom View.”
- In the “Create Custom View” dialog box:
- Choose the log you want to filter.
- Select the “By log” tab.
- Click on “Event sources” to add a filter.
- In the “Event sources” field, enter the keyword(s) related to the events you want to filter. You can also use the “Keywords” field to further narrow down your search.
- Click “OK” to apply the filter and create the custom view.
6.2. Filtering by Date and Time
Filtering events by date and time is useful when you’re investigating issues that occurred within a specific time frame. Here’s how to create a custom view based on date and time filters:
- Open Event Viewer and navigate to the desired event log.
- In the right-hand pane, click on “Create Custom View.”
- In the “Create Custom View” dialog box:
- Choose the log you want to filter.
- Select the “By date” tab.
- Set the start and end date and time for the events you want to include in the custom view.
- Click “OK” to apply the filter and create the custom view.
6.3. Saving Custom Views
After creating a custom view with specific filters, you can save it for future use. Saving custom views helps you quickly access the same filtered events without having to recreate the filters. Here’s how to save a custom view:
- After applying the desired filters and creating the custom view, go to the “Actions” pane on the right-hand side.
- Click on “Custom Views” to expand the category.
- Right-click on the custom view you created and select “Save All Events As…”
- Choose a location to save the custom view definition file (XML format) and provide a name for the file.
6.4. Accessing Saved Custom Views
To access your saved custom views in the future:
- Open Event Viewer.
- In the left-hand navigation pane, expand the “Custom Views” category.
- Click on the saved custom view to apply the previously defined filters and view the filtered events.
Creating custom views in Event Viewer is a powerful way to streamline your troubleshooting process by focusing on specific types of events or events that match particular criteria. By filtering events based on keywords or date and time and saving these custom views, you can quickly access relevant information and efficiently diagnose and resolve Windows issues. Custom views save you time and help you stay organized when working with Event Viewer logs.
Read Also : How To Fix Windows 11 Running Slow?
7. Exporting Event Logs from Event Viewer
Exporting event logs from Event Viewer can be incredibly useful for sharing information with technical support, analyzing events offline, or archiving logs for future reference. This guide will show you how to export event logs to formats like CSV and XML, and how to share these exported logs for analysis.
7.1. Exporting to CSV or XML
7.1.1. Exporting to CSV:
- Open Event Viewer and navigate to the event log you want to export.
- In the right-hand pane, click on “Export Custom View” or “Save All Events As…” (depending on your version of Windows).
- Choose a location to save the exported file and provide a name for it, ending with the “.csv” file extension.
- In the “Save as type” dropdown menu, select “CSV (Comma delimited) (*.csv).”
- Click “Save” to export the event log to CSV format.
7.1.2. Exporting to XML:
- Follow the same steps as above, but select “XML (XML Data) (*.xml)” as the “Save as type” in step 4.
- Choose a location and provide a name for the exported file with the “.xml” file extension.
- Click “Save” to export the event log to XML format.
7.2. Sharing Logs for Analysis
Exported event logs can be shared with technical experts or uploaded to online forums for troubleshooting assistance. Here’s how you can share these logs:
- If you’re sharing the log with a support team, follow their preferred method of communication (email, online portal, etc.).
- If you’re sharing the log on a forum or community platform, consider using a file-sharing service to host the file and share the download link.
- When sharing, provide context about the issue you’re facing, the events you’ve identified, and any relevant error codes.
- Make sure the exported log file is accessible and downloadable to those who need to analyze it.
Exporting event logs from Event Viewer and sharing them for analysis is a valuable technique for troubleshooting Windows issues. Whether you’re seeking assistance from technical support or a community of experts, providing detailed logs can help others understand your problem and offer effective solutions. Remember to share the exported logs securely and provide clear context to ensure accurate analysis and efficient troubleshooting.
8. Resolving Issues Based on Event Viewer Logs
Event Viewer logs can provide invaluable insights into the root causes of various Windows issues. This guide will walk you through how to use Event Viewer to address specific problems, such as driver and hardware issues, application crashes, and system startup problems.
8.1. Driver and Hardware Issues
- Identify the Issue: In Event Viewer’s “System” log, look for events with “Error” or “Warning” levels related to hardware components or drivers.
- Check Event Details: Examine the event’s description and error code. It might point to the specific hardware or driver causing the issue.
- Update or Roll Back Drivers: If the error is driver-related, visit the manufacturer’s website or use Windows Update to obtain the latest drivers. If the issue started after a driver update, consider rolling back the driver to a previous version.
- Check Hardware Connections: If the error suggests a hardware issue, ensure that all hardware components are properly connected. Reseat RAM, graphics cards, and other peripherals if needed.
- Run Hardware Diagnostics: Use built-in Windows hardware diagnostics or third-party tools to test the health of your hardware components.
8.2. Application Crashes
- Locate the Culprit: In the “Application” log, look for events with “Error” or “Critical” levels related to the application that crashed.
- Identify the Error Code: Examine the event details for error codes and descriptions associated with the crashed application.
- Update or Reinstall the Application: If the error suggests an issue with the application itself, try updating it to the latest version or reinstalling it.
- Check Dependencies: Some applications rely on specific libraries or components. Make sure these dependencies are up to date.
- Check for Software Conflicts: Conflicting software or security applications can cause crashes. Temporarily disable or uninstall recently installed software to see if the issue persists.
8.3. System Startup Problems
- Review Startup Events: In the “System” log, locate events around the time of system startup with “Error” or “Warning” levels.
- Examine Error Codes: Analyze the event descriptions and error codes to identify the cause of the startup problem.
- Check Boot Drivers: Errors related to boot drivers (e.g., hard drive or storage controller drivers) can prevent successful startup. Update or reinstall these drivers.
- Run Startup Repair: Use Windows’ built-in Startup Repair tool to fix common startup issues automatically.
- Check Hardware: Hardware failures, such as failing hard drives or faulty RAM, can cause startup problems. Run hardware diagnostics to identify any issues.
Using Event Viewer logs to address Windows issues requires careful analysis, research, and troubleshooting. By identifying patterns, interpreting error codes, and applying appropriate solutions, you can effectively resolve driver and hardware issues, application crashes, and system startup problems. Remember that Event Viewer provides valuable diagnostic information, but combining it with other diagnostic tools and best practices enhances your troubleshooting success.
9. Tips and Best Practices for Using Event Viewer Effectively
Using Event Viewer as a troubleshooting tool requires a methodical approach and adherence to best practices. This guide will provide you with tips to make the most out of Event Viewer and ensure your troubleshooting efforts are successful and efficient.
9.1. Regularly Reviewing Logs:
- Scheduled Checks: Set a regular schedule to review event logs. Regular checks can help you identify and address issues early, preventing them from escalating into bigger problems.
- Custom Alerts: Configure Event Viewer to send alerts or notifications when specific types of events occur. This can help you respond quickly to critical events.
- Archive Logs: Regularly archive or export event logs to keep historical records. Archiving is especially useful when you need to compare current events to past occurrences.
9.2. Being Cautious with Changes:
- Research First: Before making any changes based on event log information, thoroughly research the issue and proposed solutions. Rushing into changes can potentially create new problems.
- Create Backups: Whenever you’re making significant changes, such as driver updates or system modifications, create a system restore point or a full backup. This provides a safety net in case something goes wrong.
- Isolate Changes: When troubleshooting, make changes one at a time. This way, you can identify which change led to a resolution or any new issues that arise.
9.3. Combine with Other Tools:
- Use Diagnostics Tools: Event Viewer is just one tool in your troubleshooting arsenal. Combine it with built-in Windows diagnostic tools, third-party diagnostics, and hardware tests for a comprehensive approach.
- System Information: Use the “System Information” tool to gather detailed information about your hardware and software configuration. This can be valuable when analyzing event logs.
9.4. Keep Learning:
- Online Resources: Continuously seek out online resources, forums, and communities where experts discuss event log analysis and troubleshooting techniques.
- Practice: The more you work with Event Viewer and practice analyzing events, the more adept you’ll become at identifying patterns and understanding the significance of events.
9.5. Maintain Good Habits:
- Regular Maintenance: Regularly update your system, including drivers, software, and security patches. Prevention is key to avoiding potential issues.
- Monitor Resource Usage: Keep an eye on system performance using tools like Task Manager. High resource usage may lead to event log entries indicating performance problems.
Event Viewer is a powerful tool for troubleshooting Windows issues, but its effectiveness depends on your approach. By regularly reviewing logs, exercising caution with changes, combining Event Viewer with other diagnostic tools, and continuously learning, you’ll be better equipped to identify, address, and prevent problems on your Windows system. Remember that patience and a systematic approach are essential when using Event Viewer to maintain a stable and efficient computing environment.
Read Also : How To Contact Microsoft UK Customer Support [Phone, Email & Online Chat] ?
10. Conclusion
Windows Event Viewer is a valuable tool for troubleshooting a wide range of Windows problems. By navigating through event logs, interpreting event details, and using custom views and filters, you can identify and resolve issues that might impact your system’s performance and stability. Remember to stay cautious when making changes based on logs, and always prioritize regular updates and maintenance to keep your Windows system running smoothly.